
Container Water Gardens Add Tranquility to Outdoor Spaces
 Spring is an excellent time to consider simple, outdoor living enhancements like container water gardens. They add serenity and a unique, new look to home landscapes as reflections of water add another dimension of interest and movement to the surrounding space. Containers gardens are an excellent way to sample the joys of water gardening before committing to a larger, permanent pond. When planned and constructed properly, these elegant structures provide calming tranquility for many years and can be built in a single weekend.
Here are a few considerations to remember when enhancing your outdoor living space with a container water garden.
Location
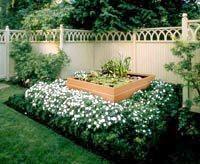
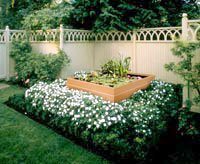
Locate your container garden so it can be easily seen from the house and serve as a focal point, drawing visitors into the garden area. Consider the following when choosing a proper location:
- A spot that is shaded in mid-to-late afternoon is ideal. Most water plants require full sun for at least five hours; three hours of direct light is the minimum.
- Keep your water garden away from overhanging branches. Falling leaves cause extra maintenance by clogging pumps and harming plants.
- Easy access to a water supply is important. Evaporated water must be replaced to keep water levels constant.
- Find a solid spot that can support the container and consider a built-in foundation riser to evenly distribute the weight.
Construction
There are unlimited possibilities for the size and shape of your garden, but usually a container with a capacity of 15 to 25 gallons is practical. Once the dimensions are determined, choosing materials comes next. One popular container building material is all-natural western red cedar. Cedar is environmentally-friendly, durable and resilient without the dangers of chemical treatment.
Chemically-treated wood has come under much scrutiny in the past year. The Environmental Protection Agency (EPA) no longer allows a common treatment chemical, chromated copper arsenate (CCA), to be used to treat wood for most residential settings. Recent studies have linked the arsenic in treated wood to cancer.
Safety is important for people making building material choices. All-natural cedar looks beautiful and its natural compounds resist rot and mildew without the need for chemical treatment.
Some additional aspects to consider during the construction phase include:
- Water weighs about 8 pounds per gallon, so be sure your container is built with sturdy 2″ by 4″, 2″ by 6″ and 2″ by 12″ sized cedar boards.
- Be sure to use corrosion-resistant nails that will endure the elements. Cedar has natural preservatives to resist rot and mildew, but fasteners will deteriorate over time.
- The inside of the container requires a polyethylene liner to retain the water — 6mm is a common liner width. Dark green, charcoal or black colored liners are suggested because they give the container an impression of greater depth, discourage algae growth and make algae less obvious when present.
Setup
Once construction is completed, you can begin inserting the actual container contents. The possibilities are endless here, with nurseries and home improvement centers having ample choices of decorative plants, flowers and rocks.
Consider using a variety of vegetation including floating plants like water lettuce, water lilies and water hyacinth, as well as bog plants like pickerel rush, lobelia, lotus and iris. Some additional tips to get your garden off to the right start:
- Plants are best started in separate pots and then transported into the water-filled container. Heavy clay garden soil is used for potting, topped with a 1/2- to-3/4 inch layer of pea gravel to keep the soil in place. Don’t use a commercial potting soil mix or any type of soil containing fertilizer. This will alter the container ecosystem.
- Some plants prefer certain depths in the water. Adjust the depth of your plants by placing blocks or bricks under the pot so the crown of the plant is at the preferred depth. About 50 to 60 percent of the water surface should be covered with plant material.
- Stones and slate can be added for interest and texture, but keep in mind that choosing dark colored rock will help discourage algae.
- Note the type of water used to fill your container garden. City water supplies are commonly treated with chlorine, which is bad for the container ecosystem. If city water is your only choice, allow the chlorine to evaporate by letting the container sit for 24 to 48 hours before adding plants.
- Remember, don’t use water from a water softener and don’t add chemicals to the water.
Maintenance
Because a container water garden is a miniature ecosystem, the plants, water and sunlight must balance together to hold algae in check. As water evaporates during the first few weeks, replace it with chlorinated water from the tap; chlorinated water helps control algae until the ecosystem is balanced, usually 60 days.