
How to Build the Perfect Deck – Installing Decking
April Wilkerson’s Guide to Creating the Ultimate Outdoor Oasis Using Real Cedar
Building your dream deck requires careful planning, informed material selection, and meticulous execution. Home improvement expert April Wilkerson understands this process inside out. In this video series, she breaks down each phase of deck construction – and all with an emphasis on doing it right. The particular video zeros in on how to install decking.
Central to April’s deck-building philosophy is her material of choice: Real Cedar decking. This isn’t just because of its stunning aesthetic appeal. As the Texan woodworker so enthusiastically puts it, “Man, do I love the way that Western Red Cedar looks. On top of looking stunning, it also has all of those wonderful natural qualities such as being naturally rot-resistant, insect-resistant, and fungus-resistant. It truly has become my go-to material choice for outdoor projects.”
This series offers a rare opportunity to learn deck-building fundamentals as well as some new and creative pro tips from one of the best in the building biz. Whether you’re an experienced DIYer or a novice looking to take on a new project, April’s step-by-step approach offers invaluable insights that can help turn your dream deck into a reality.
How to Install Decking | Best Tips
Building a deck is an exciting journey, and laying down the deck boards is one of the key steps that transforms a bare frame into a real, usable space. In this second video, home improvement expert April Wilkerson offers her top tips for deck installation, making the process smoother and more efficient.
Choosing the Right Material and Planning
One of April’s first tips is to be mindful of common material lengths when planning the deck. For example, standard deck boards come in eight- to 20-foot lengths, so planning a deck that is slightly under 60 feet long means you won’t need to cut into a fourth board to complete a row. This careful planning results in less waste and more efficient installation.
Emphasizing the Seams
Another aspect to consider is the placement of seams. Some choose to stagger them, but April decides to line them up, emphasizing them by using a 2×6 deck board on edge, creating a unique visual element. The seams not only add aesthetic value but also guide the installation of subsequent deck boards.
Setting the Gaps
Spacing between the deck boards is another crucial aspect. While April chose a 3/16” gap to match her existing porch’s spacing, the gap size is a personal preference and depends on various factors like aesthetics and drainage needs.
Ensuring a Square Installation
As you progress, it’s essential to ensure your installation remains square. This can be done by regularly measuring from both ends to the installation edge, adjusting the gaps between boards if necessary. While almost all will be straight, an occasional piece might be curved, effecting how you install it.
Securing Deck Boards
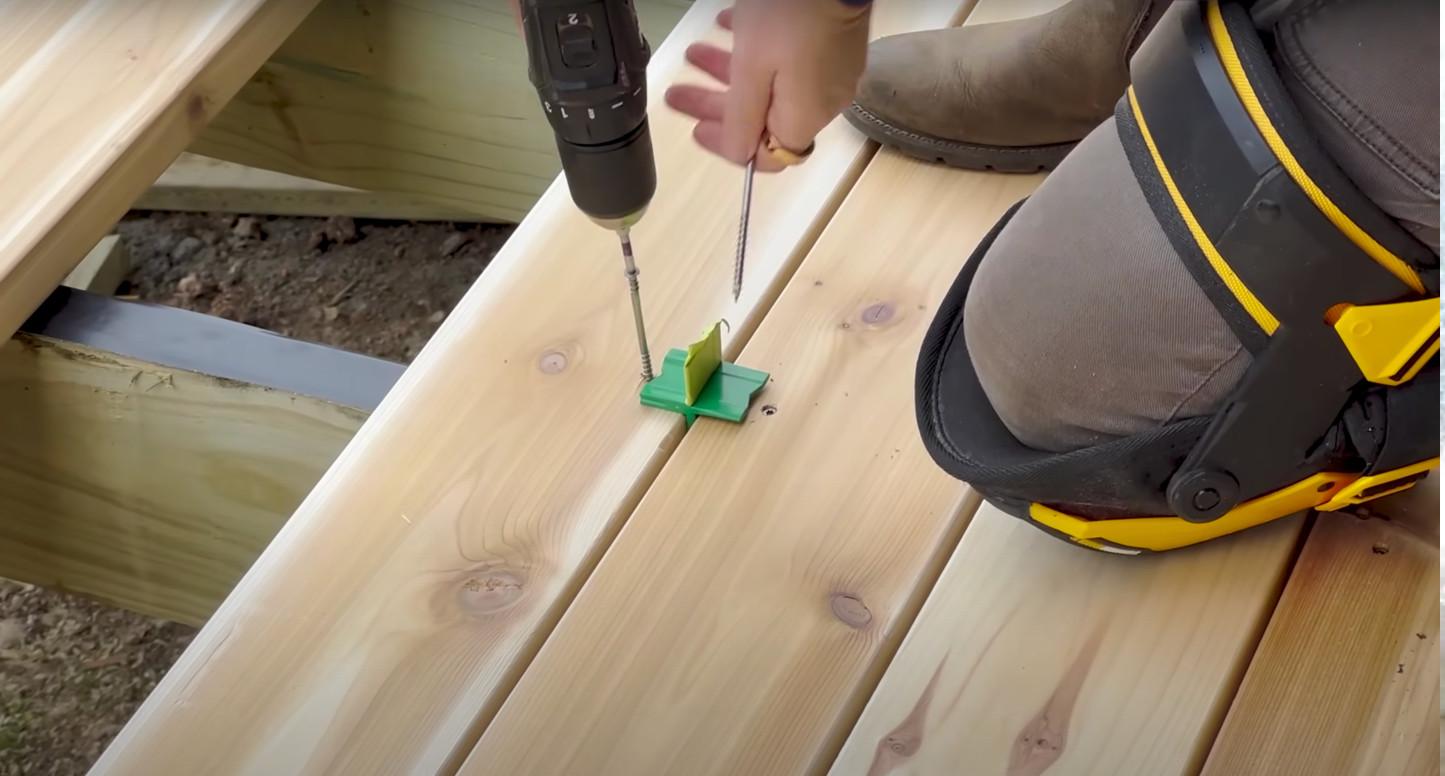
When it comes to securing deck boards, one pro-tip is to be mindful of screw placements. Having them all in line and at the same distance adds a professional touch. April uses a guide to maintain uniform screw placement. She also recommends using stainless steel screws over galvanized ones to avoid black streaks and ensure longevity.
Decking Around a Pool
If you’re installing a deck around a circular pool (as in the case of April), decking right over it can be a simple solution. Measure the circumference of the pool, find the center of the pool framing, then draw and cut a perfect circle to accommodate the pool.
Celebrate the Wins
April ends the video on a high note, saying, “I am so happy with the way this has turned out. This Western Red Cedar is gorgeous.” Her attention to detail, careful planning, and expert advice make the daunting task of deck installation manageable and enjoyable for DIY enthusiasts.
Up next, April Wilkerson shares her best practices for building outdoor staircases like a pro. You won’t want to miss her expert tips and tricks in the next part of our series! Watch the episode here.