|

why cedar
Back
why use western red cedar?
characteristics & properties of western red cedar
benefits of real cedar
real cedar history
real cedar certification
sustainability & the environment
biophilia
forestry facts
why use yellow cedar?
products
Back
siding
Back
introduction
Back
siding home
siding gallery
virtual siding samples
siding installation videos
design & spec
Back
siding grades
engineered cedar
siding calculator
prep & install
Back
preparation
pre-building
tyvek drainwrap
general installation
finish & maintain
Back
choosing a finish
how to finish
care & maintenance
restoration
siding profiles & trim
Back
bevel
trim boards
board & batten
shingle panels
tongue & groove
lap or channel
soffits and entryways
decking
Back
introduction
Back
decking home
decking gallery
virtual decking samples
design & spec
Back
decking grades
decking span charts
span tables
decking calculator
prep & install
Back
fasteners
stairs & railings
finish & maintain
Back
choosing a finish
how to finish
care & maintenance
restoration
deck projects
Back
roof deck
ground level deck
raised deck
uphill sloping lot deck
outdoor
Back
introduction
Back
outdoor home
outdoor gallery
design & spec
Back
diy plans
pre-built kits
design tips
span tables
prep & install
Back
preparation
fasteners
finish & maintain
Back
choosing a finish
how to finish
care & maintenance
restoration
fencing
Back
fencing home
fence construction
fence specifications
pre-built fence panels
indoor
Back
introduction
Back
indoor home
indoor gallery
design & spec
Back
design tips
prep & install
Back
preparation
finish & maintain
Back
how to finish
care & maintenance
indoor projects
Back
saunas
doors & windows
tongue & groove paneling
blinds & shutters
timbers
Back
introduction
Back
timbers home
timbers gallery
virtual timber samples
design & spec
Back
grades & specs
engineered cedar
span tables
prep & install
Back
preparation
installation
finish & maintain
Back
how to finish
care & maintenance
restoration
diy projects
membership
Back
our members
Back
executive members
retailers
partners
tertiary manufacturers
certified cedar distributors
certified cedar distributors – usa
certified cedar distributor – canada
architects
international associates
why become a member?
membership levels
membership benefits
membership faq
join the wrcla!
member support
resources
Back
real cedar resources
blog
gallery
videos
cedar books
|
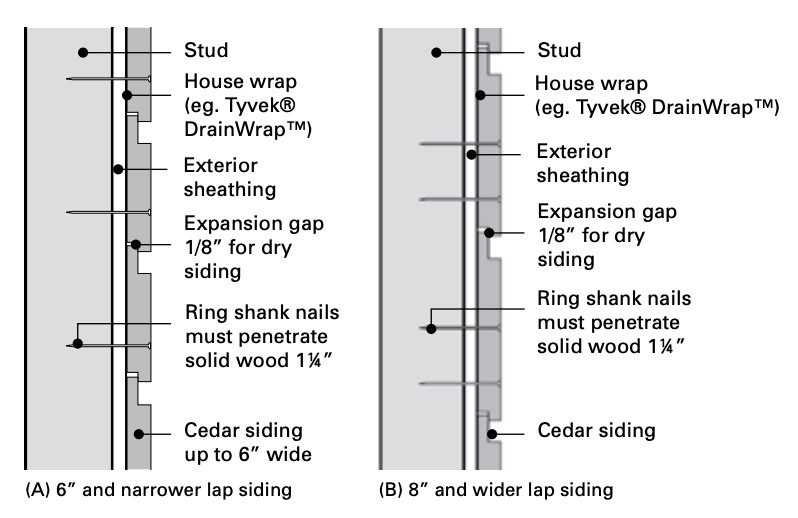
Installing Lap or Channel Siding
Installing Lap Siding
Lap siding can be installed horizontally or vertically. For horizontal applications, start with the bottom course and work up with the channels pointing upwards. Allow a 1/8 inch expansion gap between pieces if the siding is air or kiln-dried. Do not nail through overlaps. For siding up to 6 inches wide, use one nail one inch up from the lap. Face nail with two nails per piece for 8 inches patterns and wider, keeping nails 2-1/2 to 3 inches apart to allow for dimensional movement without splitting. For vertical applications, siding should be nailed to horizontal blocking or furring strips.
Available from our Premium Retailers


You
Cedar as much as we do?


© 2026 All rights reserved
Gatsby Website Development by Jambaree